
Fiber media converters are essential tools for businesses and individuals looking to bridge the gap between different types of network infrastructure, specifically between fiber optic and copper networks. These devices allow for seamless data transmission between equipment that uses different communication mediums. Installing and using a fiber media converter is straightforward, but proper setup ensures that your network operates efficiently and reliably. Here’s a step-by-step guide on how to install and use a fiber media converter.
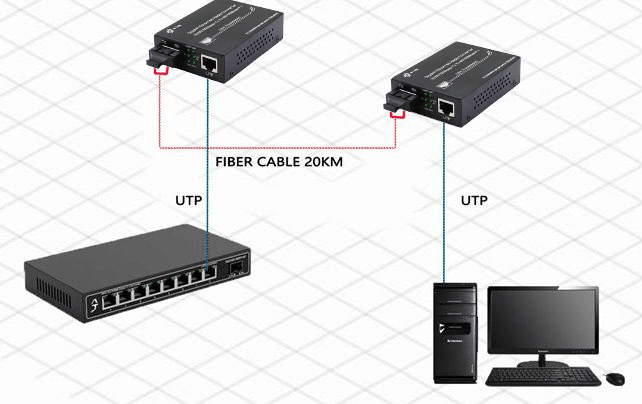
What is a Fiber Media Converter?
Before we dive into the installation process, let’s quickly define what a fiber media converter is. A fiber media converter is a networking device that allows you to connect devices using different types of media. It typically converts electrical signals from copper-based Ethernet networks (using twisted pair cables) into optical signals that can travel over fiber optic cables, and vice versa. The main advantage of using a media converter is that it enables you to extend the reach and improve the speed of your network connections by using fiber optics, while still supporting legacy copper network devices.
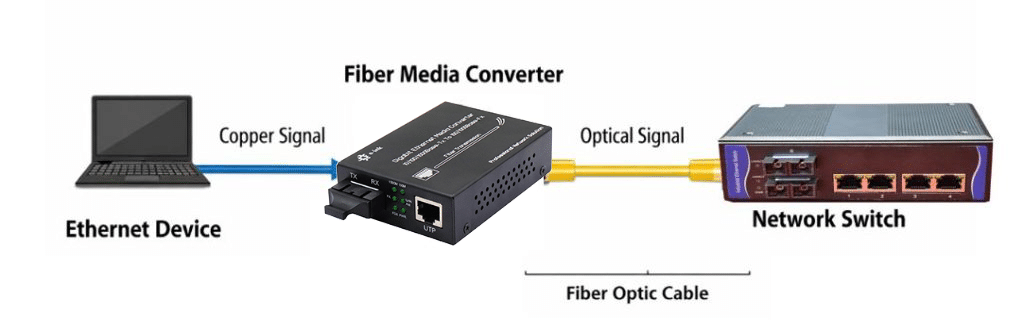
How to Install and Use a Fiber Media Converter
l Step 1: Preparation—Compatibility is Everything
Before you touch a single cable, verify three things. Skipping this is the number one cause of “why won’t it link?”
Fiber Type Consistency:
You cannot directly connect single-mode and multimode fiber without specialized mode conditioning patch cords, and even then, distance limitations apply. For standard deployments, maintain consistent fiber type end-to-end.
Wavelength Matching:
When using duplex (two-fiber) cables, the transceivers on both ends must operate at the same wavelength (e.g., 850nm for multimode, 1310nm/1550nm for single-mode). Mixing 1310nm on one end and 1550nm on the other will result in signal loss or a dead link.
Speed Parity
A Gigabit SFP transceiver must be paired with a Gigabit-rated media converter. Similarly, a 10G SFP+ requires a converter that explicitly supports 10G speeds .
Not sure which model to choose? Here are some reliable options for different scenarios.
l Step 2: Physical Installation—Where and How to Mount
Media converters generate heat. They also need to stay secure.
Desktop Placement: If you are setting up a temporary lab or a small office, simply place the converter on a flat, stable surface. Ensure the rubber feet are attached and that there is airflow space above and below the unit .
Wall Mount: For permanent installations in closets or under desks, use the mounting brackets included with most industrial or enterprise converters. Secure the bracket to drywall or concrete with appropriate anchors, then fasten the converter to the bracket .
Rack Mount (Scalability): In data centers or wiring closets with multiple converters, a chassis solution is best. Slide the converter PC boards into a rack-mountable chassis (e.g., a 12-slot unit). This allows you to manage power redundancy and keeps cabling organized .

l Step 3: The Connection Sequence
There is a logical flow to cabling that minimizes confusion and prevents damage to optics.
1. Insert the SFP Transceiver (If Applicable)
If you are using a modular media converter (which is highly recommended for flexibility), this is a mandatory step. The SFP module dictates the specifications of your fiber link—whether it runs for 300 meters or 40 kilometers. SFP modules are hot-pluggable. Insert the module into the SFP slot firmly until it clicks. Always remove the fiber cable before removing the SFP, and always keep dust caps on optics when not in use.
2. Connect the Fiber Cable
For Duplex (Two-Fiber) Links: You Must Cross the Connection
Duplex cables use two separate strands: one for transmitting (TX) and one for receiving (RX). A common rookie mistake is to connect them “straight” (TX to TX and RX to RX). This will never work.
The Rule: The TX port on Device A must go to the RX port on Device B. Conversely, the TX port on Device B must go to the RX port on Device A.

For BiDi (Single-Fiber) Links: Pay Attention to Wavelength
BiDi (Bidirectional) technology sends and receives data on different wavelengths of light over a single fiber strand.
The Rule: These modules always work in matched pairs. If you have a BiDi module that transmits at 1310nm and receives at 1550nm on one end, the other end must be the inverse (transmit at 1550nm, receive at 1310nm).
3. Connect the Copper (RJ45) Cable
Use Cat6 for Gigabit links and Cat6a or Cat7 for 10G links. Connect one end to the converter’s RJ45 port, and the other to your switch, PC, or router .
4. Power On
Connect the power adapter. If your model uses a locking or screw-in connector (common on industrial units), secure it firmly to prevent accidental disconnection . Verify the POWER LED is illuminated.
l Step 4: Test the Connection
After installation, it’s important to test the network connection to ensure that everything is working as expected.
Verify Link Status: Most media converters have an LED that indicates the status of the fiber and copper connections. If the link is active, the lights will typically be solid green. If there’s an issue, the link light may blink or remain off, indicating a problem.

Test Network Connectivity: Perform a basic ping test between the devices on both ends of the converter. If the devices can communicate with each other, the converter is working correctly.
Check Network Speed: If your converter supports high-speed connections (such as 1 Gbps or 10 Gbps), run a speed test using network diagnostic tools like iPerf to verify that the converter is operating at the correct speed.
l Step 5: Troubleshooting Common Issues
Even though fiber media converters are generally simple to install, you may run into some issues. Here are a common troubleshooting tips: Common Utility Fiber Media Converters problems and How to Solve Them
No Link Light: Verify TX/RX crossover on duplex fiber; check wavelength compatibility; inspect for damaged connectors
Intermittent Link: Clean all fiber end-faces with appropriate consumables; check optical power budget
Slow Throughput: Confirm duplex settings match on both ends; test with iPerf–Tools for measuring the maximum achievable bandwidth of an IP network– to establish baseline
SFP Not Recognized: Verify compatibility with converter vendor; reset module; test with known-good SFP.
Common Use Cases for Fiber Media Converters
Understanding the “how” of installation is essential, but knowing when and why to use a media converter is what transforms a good network technician into a great one. The 100-meter limit of copper has shaped network design for decades, but real-world environments don’t always cooperate—whether due to sprawling facilities, electrical interference, or existing legacy infrastructure.
Fiber media converters elegantly solve these challenges. While their basic function is straightforward, their application versatility is remarkable. Here are seven common scenarios where media converters prove invaluable—and how each leverages the technology differently.
1. Extending Surveillance Networks Across Large Properties
A distribution center needs security cameras placed 300 meters away from the central switch, which is beyond the Ethernet cable’s reach. Media converters bridge this gap by converting Ethernet to fiber for long-distance transmission, eliminating the distance barrier and maintaining full Gigabit throughput.
2. Connecting Building-to-Building Campus Links
In a campus with separate buildings for administration, academics, and dormitories, direct burial copper Ethernet cables are vulnerable to lightning strikes and ground loops. Using media converters, copper Ethernet signals are converted to fiber and transmitted between buildings, avoiding electrical issues and extending the range without repeaters.
3. Integrating Legacy Coax Infrastructure
Many businesses still rely on legacy coaxial cables for their security cameras but want to modernize their networks. Deploy BNC-to-fiber media converters. The coax connects directly to the converter’s BNC port, which converts the analog signal to fiber, then back to copper Ethernet at the head end. These specialized converters support composite video, HD-TVI, AHD, or even legacy analog signals. They eliminate the need to re-cable entire facilities while modernizing the network architecture.
4. Powering Remote Devices Without Local Electricity
In situations where devices like Wi-Fi access points are located far from the nearest power source, a PoE-powered media converter can deliver both power and data over a single fiber link. The converter uses PoE technology to provide power to remote devices, making installations more efficient and eliminating the need for local electrical outlets.
5. Industrial and Factory Floor Deployments
In environments like manufacturing plants, where electromagnetic interference (EMI) from heavy machinery disrupts copper Ethernet connections, fiber optic cables are immune to EMI. Media converters help industrial environments deploy fiber networks that maintain stable connections despite harsh conditions.
6. WDM and Fiber Consolidation
Companies that lease dark fiber between data centers can utilize Wavelength Division Multiplexing (WDM) media converters. These converters allow multiple independent data streams to share a single fiber, greatly increasing the efficiency of the fiber infrastructure.
7. Temporary and Event Networks
For large, temporary events such as stadium productions, fiber media converters allow for rapid deployment of a network infrastructure that is rugged and flexible. Pre-terminated tactical fiber assemblies, combined with media converters, provide high-speed network capabilities for short-term setups.
Pro Tip: For broadcast video, look for 12G-SDI to fiber converters supporting uncompressed 4K video transport over distances impossible with copper SDI.
Conclusion
A fiber media converter is not just a “dumb adapter.” When properly matched and installed, it is a transparent extension of your Ethernet network—one that happens to run for kilometers without signal degradation.
The formula for success is simple: match your media types (SM/MM), cross your duplex fibers, and verify your link budget. Whether you are deploying a single camera or designing a campus backbone, this device remains one of the most reliable tools in the physical layer engineer’s kit.
Have you encountered a tricky media converter install? What’s the longest fiber run you’ve deployed? Share your experience in the comments.